Zombie makeup has become one of the most popular Halloween and cosplay trends. It allows you to transform into a creepy, undead character with creativity and fun. In this zombie makeup tutorial, you’ll learn step-by-step techniques for both easy and realistic looks. We’ll also cover product kits, safety tips, and plenty of zombie makeup ideas.
What Is Zombie Makeup & Why It’s Popular
Zombie makeup is a style of horror makeup designed to mimic undead creatures. It’s often inspired by movies, TV shows, and spooky pop culture references. People use zombie makeup for Halloween, cosplay events, and themed parties worldwide. The popularity comes from its versatility, ranging from easy face paint to advanced SFX looks.
Essential Tools & Products for Zombie Makeup
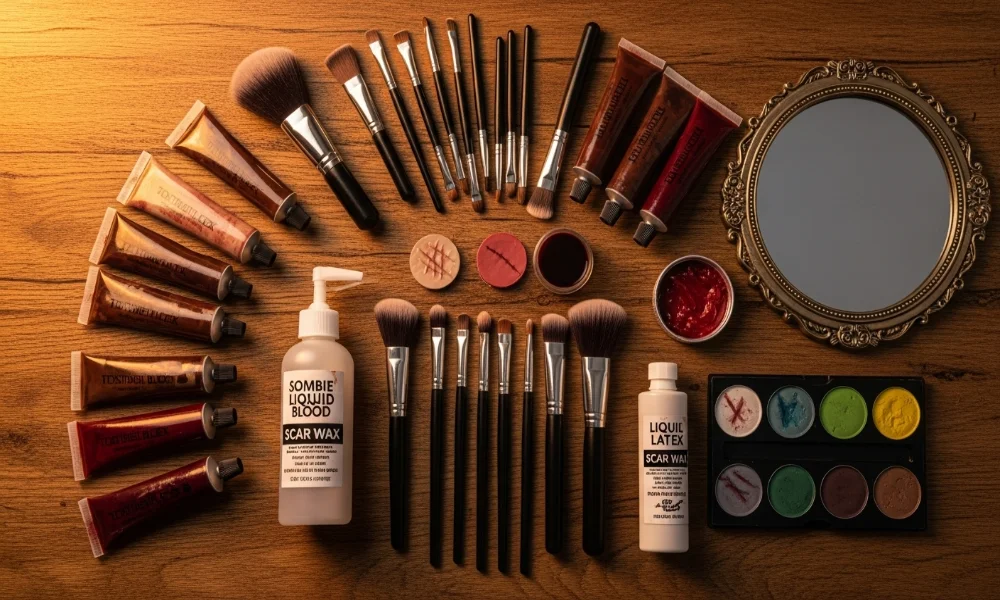
Before starting your zombie makeup tutorial, you need the right tools and products. Beginners can create scary looks with basic makeup items found in stores. Advanced creators often use special effects products like latex and scar wax. Choosing the right kit depends on your budget, creativity, and experience level.
Basic Kit (for Beginners)
A simple zombie face makeup kit is great for anyone starting out. Most beginners only need pale foundation, dark eyeshadows, and fake blood. Using a sponge and brush helps in blending shadows around eyes and cheeks. These tools make it possible to create easy zombie makeup quickly and safely.
Special Effects / Advanced Kit
If you want realistic zombie makeup, SFX tools are essential for the process. Items like liquid latex and scar wax help create torn skin and wounds. Fake blood, gore gel, and tissue paper add depth and scary effects. With practice, advanced kits can produce terrifying results for cosplay or events.
Recommended Kit Comparison Table
| Kit Type | Tools Included | Skill Level | Approx Cost |
|---|---|---|---|
| Basic Starter Kit | Face paints, brushes, fake blood, pale base | Beginner | $20–$40 |
| Advanced SFX Kit | Latex, scar wax, prosthetics, gore gel | Intermediate–Advanced | $50–$100 |
Step-by-Step Zombie Makeup Tutorial
Now it’s time to walk through a complete zombie makeup tutorial. Follow these steps to create a creepy and authentic undead look. Each step is simple and works for beginners or advanced makeup lovers. Practice before your event so your zombie transformation looks seamless and impressive.
Step 1 Skin Prep & Base Application
Always start by prepping your skin with moisturizer and primer before makeup. Apply a foundation that is at least two shades lighter than your skin. Blend it evenly across your face, neck, and ears for a pale look. This base helps set the stage for adding zombie-style shadows and wounds.
Step 2 Creating the Pale/Decayed Complexion
To look like a true zombie, you need a decayed complexion effect. Use grey, white, or light green face paints for a dead-like tone. Blend colors softly into the skin for a patchy and realistic finish. Adding hints of yellow or purple makes skin appear bruised and infected.
Step 3 Contour, Shadows & Sunken Features
Hollow and sunken features make zombie makeup realistic and creepy. Use dark brown, black, or grey eyeshadows to contour cheeks and temples. Shade around eyes to give a tired, undead, or haunting appearance. Blend shadows outward for a seamless but unsettling effect on the face.
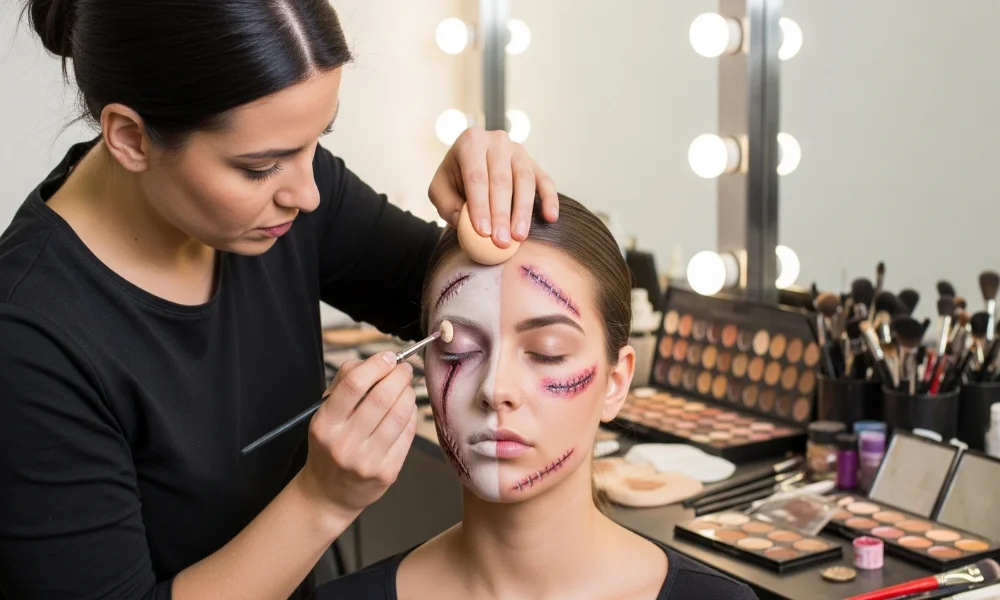
Step 4 Wounds, Tears & Texture (SFX Techniques)
Creating wounds brings zombie makeup to life with special effects. Apply liquid latex with tissue to build layers that resemble torn skin. Once dry, gently pull edges up and paint them red or black. These textured wounds make your zombie look disturbingly realistic and scary.
Step 5 Add Fake Blood & Gore Effects
Fake blood is the finishing touch in any zombie makeup tutorial. Drip thin blood around the mouth for a freshly bitten effect. Use thicker gore gel on wounds for a clotted, messy, and gruesome style. Applying blood in different textures makes the overall look more horrifying.
Step 6 Final Touches & Finishing
Add dirt and grime effects with dark brown or green shadows. Lightly smudge black makeup for cracks, bruises, or vein-like details. Zombie contact lenses can instantly boost the scary and dead appearance. Finish with makeup setting spray to keep your zombie face intact longer.
Zombie Makeup Ideas & Styles to Try
There are countless zombie makeup ideas that you can experiment with creatively. Some people love classic undead looks, while others prefer more artistic styles. Whether you want an easy zombie makeup idea or advanced SFX, options are endless. Each style can be adapted to fit your comfort, time, and skill level.
Easy vs Realistic Zombie Makeup Styles
Easy zombie makeup styles often use simple products like eyeshadows and fake blood. Realistic zombie makeup includes advanced techniques with latex, wounds, and prosthetics. Beginners can start with shading eyes and cheeks for a spooky look. Professionals can add torn skin, bruising, and contact lenses for realism.
Creative Zombie Styles to Experiment With
Zombie looks can also be playful, artistic, or themed for fun. Try neon zombie makeup for a bright pop art effect with colors. A glam zombie uses glitter with pale base and dramatic fake lashes. You could also test gothic zombie looks with black lipstick and eerie contact lenses.
Tips, Mistakes to Avoid & Skin Safety
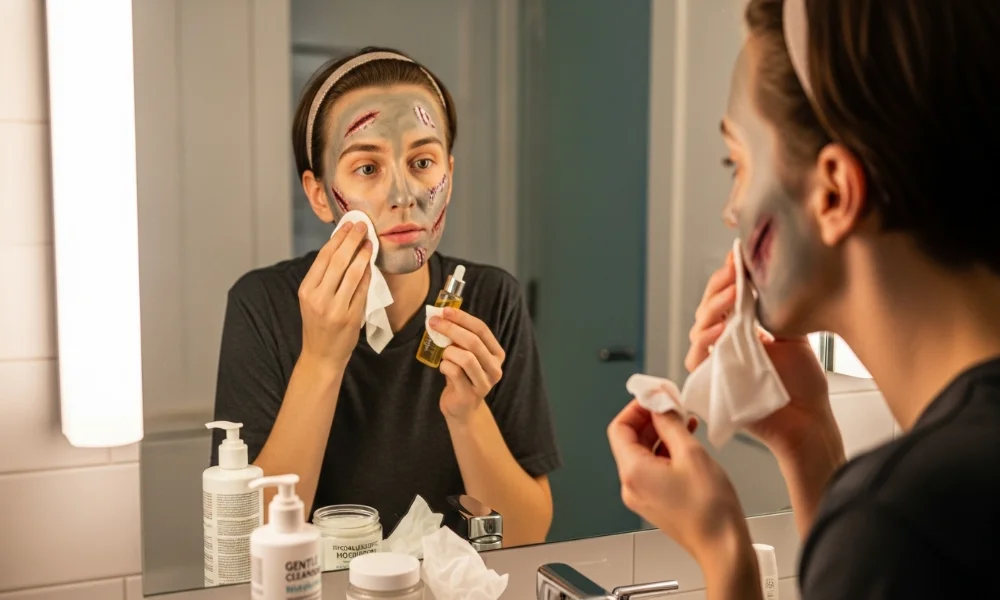
While doing zombie makeup, it’s important to follow safe practices always. Some products like latex may cause allergies or skin irritation if untested. Doing a patch test before using new products helps prevent issues. Always remove zombie makeup gently using remover, wipes, or gentle cleansers.
Common Mistakes to Avoid
Many beginners apply heavy layers, making the makeup look unnatural or cakey. Another mistake is failing to blend shadows and wounds properly. Using too much fake blood often hides other details on the face. Avoid rushing; practice ahead of time for the best zombie face makeup.
Quick Tips for Better Results
Work in thin layers so the makeup looks believable and creepy. Use different textures for wounds to make them more realistic in photos. Blend shadows outward instead of inward to create natural hollow areas. Remember, less can be more when you want authentic zombie details.
Where & How to Buy Zombie Makeup Kits & Products
Finding the right zombie makeup kit makes the process easier and faster. Many starter kits are available in local costume shops and online. Look for kits that include fake blood, latex, paints, and brushes. For advanced results, SFX kits with scar wax and prosthetics are better.
Online vs Local Stores
Online stores offer variety and affordable zombie makeup kits for beginners and pros. Local stores are great when you need products last-minute before an event. Always check that items are labeled safe for skin and non-toxic. Reading reviews helps in finding quality products that look good on camera.
FAQ
How long does zombie makeup last?
Zombie makeup can last several hours with setting spray and careful application. Sweat, eating, and moving may shorten its durability during events. Using waterproof paints and latex makes makeup stay intact for longer. Touch-ups during parties or shoots are often needed for perfect looks.
Can you reuse prosthetics or latex?
Some prosthetics are reusable if cleaned gently after wearing them once. Latex wounds are usually single-use, since they peel off after drying. Investing in reusable scar wax can save costs for regular SFX makeup fans. Always check packaging to know whether an item is disposable or reusable.
What if I have sensitive skin?
If you have sensitive skin, avoid harsh latex or alcohol-based products. Hypoallergenic paints and gentle adhesives are safer for delicate skin types. Always do a small patch test at least 24 hours before applying. Removing makeup with oil-based cleansers helps prevent dryness or irritation.
Can you do zombie makeup for hands and body?
Yes, zombie makeup can be applied to hands, arms, or legs as well. Using body paints, bruising colors, and fake blood creates extended undead effects. Add grime and wounds to arms for a scarier full-body cosplay. Remember to set with powder or spray so body makeup lasts longer.
Conclusion
Zombie makeup is a fun and creative way to transform yourself completely. With this zombie makeup tutorial, you can try easy or advanced styles. Using the right tools, fake blood, and special effects gives great results. Practice, experiment, and enjoy creating your unique undead character this seaso